iOS で SceneKit を試す(Swift 3) その27 - ビルトインジオメトリ SCNSphere(球)
球のジオメトリ。

Scene Editor でのパラメーター
オブジェクトライブラリの Sphere か GeoSphere を Scene Editor にドラッグ&ドロップして、Attributes Inspector を開く(Command + Option + 4)
1番上の Sphere の項目で設定値が変更できる

Sphere と GeoSphere の違いは、 ジオメトリの名前と、geodesic にチェックがついているか否か。
Dimensions
Radius
球の半径で初期値は 1。 半径であるため、ジオメトリは倍の大きさになる。
Segment Count
X軸とY軸方向での外周での分割数。 初期値は 24。
Geodesic のチェックが入っていると正20面体からの分割数となる。
Geodesic
チェックすると三角ポリゴンを均等に麺が構成される。
下記の画像参照。
Geodesic: false(デフォルト)
分割数 16

Geodesic: true
分割数 16

コード
// シーン設定
let scnView = self.view as! SCNView
scnView.showsStatistics = true
scnView.allowsCameraControl = true
scnView.debugOptions = .showWireframe // ワイヤーフレーム表示

let scene = SCNScene()
scene.background.contents = UIColor.white
scnView.scene = scene

// カメラ設定
let cameraNode = SCNNode()
cameraNode.camera = SCNCamera()
cameraNode.position = SCNVector3(2.372,1.473,2.399)
cameraNode.eulerAngles = SCNVector3(-Float.pi * 0.125,Float.pi * 0.25,0)
scene.rootNode.addChildNode(cameraNode)

// ライト設定
let lightNode = SCNNode()
let omniLight = SCNLight()
omniLight.type = .omni
lightNode.light = omniLight
lightNode.position = SCNVector3(0,5,0)
scene.rootNode.addChildNode(lightNode)

// SCNSphere
let sphere = SCNSphere(radius: 1)

/*
sphere.radius = 1
sphere.isGeodesic = true
*/

sphere.segmentCount = 16


sphere.firstMaterial?.diffuse.contents = UIColor.black // ワイヤーフレームを見やすくするため黒色に。

let node = SCNNode(geometry: sphere)
scene.rootNode.addChildNode(node)
今回はここまで。
iOS で SceneKit を試す(Swift 3) その26 - ビルトインジオメトリ SCNPyramid(三角錐)
三角錐のジオメトリ。

Scene Editor でのパラメーター
オブジェクトライブラリの Pyramid を Scene Editor にドラッグ&ドロップして、Attributes Inspector を開く(Command + Option + 4)
1番上の Pyramid の項目で設定値が変更できる

Size
幅、高さ、奥行きが設定できる。 初期値は 1。
Segment Count
幅、高さ、奥行きの分割数。 初期値は 1。
幅、高さ、奥行きの分割数 4。

コード
// シーン設定
let scnView = self.view as! SCNView
scnView.showsStatistics = true
scnView.allowsCameraControl = true
scnView.debugOptions = .showWireframe // ワイヤーフレーム表示

let scene = SCNScene()
scene.background.contents = UIColor.white
scnView.scene = scene

// カメラ設定
let cameraNode = SCNNode()
cameraNode.camera = SCNCamera()
cameraNode.position = SCNVector3(2.372,1.473,2.399)
cameraNode.eulerAngles = SCNVector3(-Float.pi * 0.125,Float.pi * 0.25,0)
scene.rootNode.addChildNode(cameraNode)

// ライト設定
let lightNode = SCNNode()
let omniLight = SCNLight()
omniLight.type = .omni
lightNode.light = omniLight
lightNode.position = SCNVector3(0,5,0)
scene.rootNode.addChildNode(lightNode)

// SCNPyramid
let pyramid = SCNPyramid(width: 1, height: 1, length: 1)

/*
pyramid.width = 1
pyramid.height = 1
pyramid.length = 1
*/

pyramid.widthSegmentCount = 4
pyramid.heightSegmentCount = 4
pyramid.lengthSegmentCount = 4

pyramid.firstMaterial?.diffuse.contents = UIColor.black // ワイヤーフレームを見やすくするため黒色に。

let node = SCNNode(geometry: pyramid)
scene.rootNode.addChildNode(node)
今回はここまで。
iOS で SceneKit を試す(Swift 3) その25 - ビルトインジオメトリ SCNPlane(平面)
奥行き 0 の縦状態がデフォルトの平面のジオメトリで、角を丸くすることができる。
このビルトインジオメトリは、デフォルトでマテリアルがポリゴンが両面描画される。

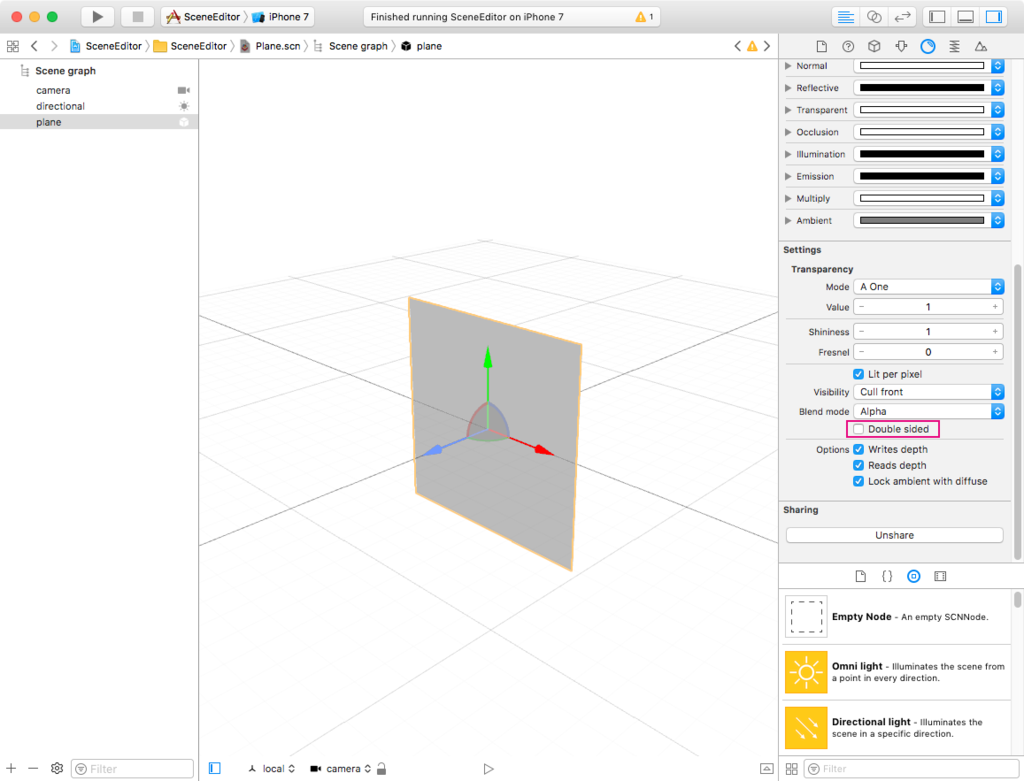
裏面が必要ない場合は Material Inspector(Command + Option + 5)> Setting > Double sided のチェックを外す。

また、表面を Y 軸プラス方向に向けたい場合は X軸を -90 傾ける

Scene Editor でのパラメーター
オブジェクトライブラリの Plane を Scene Editor にドラッグ&ドロップして、Attributes Inspector を開く(Command + Option + 4)
1番上の Plane の項目で設定値が変更できる

Size
幅と高さが設定できる。 初期値は 1。
Corner radius
角丸の大きさ 初期値は 0。
値が 0.2 の場合。

Segment Count
幅と高さの分割数。 初期値は 1。
Corner
角丸の分割数。 初期値は 10。
幅、高さの分割数 4。

コード
// シーン設定
let scnView = self.view as! SCNView
scnView.showsStatistics = true
scnView.allowsCameraControl = true
scnView.debugOptions = .showWireframe // ワイヤーフレーム表示

let scene = SCNScene()
scene.background.contents = UIColor.white
scnView.scene = scene

// カメラ設定
let cameraNode = SCNNode()
cameraNode.camera = SCNCamera()
cameraNode.position = SCNVector3(2.372,1.473,2.399)
cameraNode.eulerAngles = SCNVector3(-Float.pi * 0.125,Float.pi * 0.25,0)
scene.rootNode.addChildNode(cameraNode)

// ライト設定
let lightNode = SCNNode()
let omniLight = SCNLight()
omniLight.type = .omni
lightNode.light = omniLight
lightNode.position = SCNVector3(0,5,0)
scene.rootNode.addChildNode(lightNode)

// SCNPlane
let plane = SCNPlane(width: 1, height: 1)

/*
plane.width = 1
plane.height = 1
plane.cornerRadius = 0.2
*/

plane.widthSegmentCount = 4
plane.heightSegmentCount = 4
plane.cornerSegmentCount = 4

plane.firstMaterial?.diffuse.contents = UIColor.black // ワイヤーフレームを見やすくするため黒色に。

let node = SCNNode(geometry: plane)
scene.rootNode.addChildNode(node)
今回はここまで。
iOS で SceneKit を試す(Swift 3) その24 - ビルトインジオメトリ SCNCylinder(円柱)
円柱のジオメトリ。

Scene Editor でのパラメーター
オブジェクトライブラリの Cylinder を Scene Editor にドラッグ&ドロップして、Attributes Inspector を開く(Command + Option + 4)
1番上の Cylinder の項目で設定値が変更できる

Dimensions
Radius
底の半径。
初期値は 0.5。
Height
円柱の高さ。
初期値は 1。
Segment Count
Radial
外周部分のポリゴンの分割数。
初期値は 48。
Height
円柱の高さの分割数。
初期値は 1。
コード
// シーン設定
let scnView = self.view as! SCNView
scnView.showsStatistics = true
scnView.allowsCameraControl = true
scnView.debugOptions = .showWireframe // ワイヤーフレーム表示

let scene = SCNScene()
scene.background.contents = UIColor.white
scnView.scene = scene

// カメラ設定
let cameraNode = SCNNode()
cameraNode.camera = SCNCamera()
cameraNode.position = SCNVector3(2.372,1.473,2.399)
cameraNode.eulerAngles = SCNVector3(-Float.pi * 0.125,Float.pi * 0.25,0)
scene.rootNode.addChildNode(cameraNode)

// ライト設定
let lightNode = SCNNode()
let omniLight = SCNLight()
omniLight.type = .omni
lightNode.light = omniLight
lightNode.position = SCNVector3(0,5,0)
scene.rootNode.addChildNode(lightNode)

// SCNCylinder
let cylinder = SCNCylinder(radius: 0.5, height: 1)

/*
cylinder.radius = 0.5
cylinder.height = 1
*/

cylinder.radialSegmentCount = 48
cylinder.heightSegmentCount = 1

cylinder.firstMaterial?.diffuse.contents = UIColor.black // ワイヤーフレームを見やすくするため黒色に。

let node = SCNNode(geometry: cylinder)
scene.rootNode.addChildNode(node)
今回はここまで。
iOS で SceneKit を試す(Swift 3) その23 - ビルトインジオメトリ SCNCone(円錐)
円錐のジオメトリ。

Scene Editor でのパラメーター
オブジェクトライブラリの Cone を Scene Editor にドラッグ&ドロップして、Attribute Inspector を開く(Command + Option + 4)
1番上の Cone の項目で設定値が変更できる

Dimensions
Top radius
上底の半径。
初期値は 0。
Bottom radius と同じ値にすると円柱になる

Bottom radius
下底の半径
初期値は 0.5。
Height
円錐の高さ。
初期値は 1。
Segment Count
Radial
外周部分のポリゴンの分割数。
初期値は 48。
Height
円錐の高さの分割数。
初期値は 1。
以下のコードのようにセグメント設定したもの
- 外周部分 16
- 高さ 2

コード
// シーン設定
let scnView = self.view as! SCNView
scnView.showsStatistics = true
scnView.allowsCameraControl = true
scnView.debugOptions = .showWireframe // ワイヤーフレーム表示

let scene = SCNScene()
scene.background.contents = UIColor.white
scnView.scene = scene

// カメラ設定
let cameraNode = SCNNode()
cameraNode.camera = SCNCamera()
cameraNode.position = SCNVector3(2.372,1.473,2.399)
cameraNode.eulerAngles = SCNVector3(-Float.pi * 0.125,Float.pi * 0.25,0)
scene.rootNode.addChildNode(cameraNode)

// ライト設定
let lightNode = SCNNode()
let omniLight = SCNLight()
omniLight.type = .omni
lightNode.light = omniLight
lightNode.position = SCNVector3(0,5,0)
scene.rootNode.addChildNode(lightNode)

// SCNCone
let cone = SCNCone(topRadius: 0, bottomRadius: 0.5, height: 1)

cone.topRadius = 0
cone.bottomRadius = 0.5
cone.height = 1

cone.radialSegmentCount = 16
cone.heightSegmentCount = 2

cone.firstMaterial?.diffuse.contents = UIColor.black // ワイヤーフレームを見やすくするため黒色に。

let node = SCNNode(geometry: cone)
scene.rootNode.addChildNode(node)
今回はここまで。
iOS で SceneKit を試す(Swift 3) その22 - ビルトインジオメトリ SCNCapsule(カプセル型)
円柱の上下に半球をつけたカプセル型のジオメトリ。

Scene Editor でのパラメーター
オブジェクトライブラリの Capsule を Scene Editor にドラッグ&ドロップして、Attribute Inspector を開く(Command + Option + 4)
1番上の Capsule の項目で設定値が変更できる

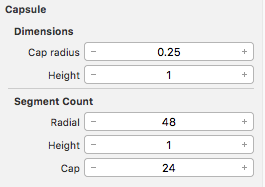
Dimensions
Cap radius
カプセルの半径。
初期値は 0.25。
Cap radius
カプセルの高さ(半球部分も含む)
初期値は 1。
高さは半球含むため、高さ 1、半径 0.5 にすると球体になる。
Segment Count
Radial
半球外周部分のポリゴンの分割数。
初期値は 48。
Height
円柱の分割数。
初期値は 1。
Cap
半球の高さ部分のポリゴンの分割数。
初期値は 24。
下記のコードのセグメントを分割した例。
- 半球外周部分 16
- 半球の高さ 3
- 円柱の高さ 2

コード
// シーン設定
let scnView = self.view as! SCNView
scnView.showsStatistics = true
scnView.allowsCameraControl = true
scnView.debugOptions = .showWireframe // ワイヤーフレーム表示

let scene = SCNScene()
scene.background.contents = UIColor.white
scnView.scene = scene

// カメラ設定
let cameraNode = SCNNode()
cameraNode.camera = SCNCamera()
cameraNode.position = SCNVector3(2.372,1.473,2.399)
cameraNode.eulerAngles = SCNVector3(-Float.pi * 0.125,Float.pi * 0.25,0)
scene.rootNode.addChildNode(cameraNode)

// ライト設定
let lightNode = SCNNode()
let omniLight = SCNLight()
omniLight.type = .omni
lightNode.light = omniLight
lightNode.position = SCNVector3(0,5,0)
scene.rootNode.addChildNode(lightNode)

// SCNCapsule
let capsule = SCNCapsule(capRadius: 0.25, height: 2)

/*
capsule.capRadius = 0.25
capsule.height = 2
*/

capsule.radialSegmentCount = 16
capsule.heightSegmentCount = 2
capsule.capSegmentCount = 3

capsule.firstMaterial?.diffuse.contents = UIColor.black // ワイヤーフレームを見やすくするため黒色に。

let node = SCNNode(geometry: capsule)
node.eulerAngles = SCNVector3(Float.pi * 0.2, 0, -Float.pi * 0.075)
scene.rootNode.addChildNode(node)
注意点
ノードの拡大縮小を変更した場合、半球の部分を保って変形されることはない。
特に Y 軸の変更の際は注意。

今回はここまで。
iOS で SceneKit を試す(Swift 3) その21 - ビルトインジオメトリ SCNBox(立方体)
立方体のジオメトリ。角を丸くすることができる。

Scene Editor でのパラメーター
オブジェクトライブラリの Box を Scene Editor にドラッグ&ドロップして、Attributes Inspector を開く(Command + Option + 4)
1番上の Box の項目で設定値が変更できる

Size
width、height、length で設定する。
初期値は1。
| 名称 | 意味 |
|---|---|
| width | 幅 |
| height | 高さ |
| length | 奥行き |
Chamfer radius
角丸の半径の値でデフォルトは0。
width、height、length が 1 で Chamfer radius 1 の場合は球体になる。
Segment Count
面のポリゴンの分割数を width、height、length で設定する。
初期値は 1 で Int 型。
初期値 1 と width、height、length、すべての値 4

シェーダーでジオメトリをいじる際に使用するものだと思われる。
また、各面で分割できるため、隣接する各面は繋がっておらず、6面の平面が独立している。
Chamfer Segment Count
角丸のポリゴンの分割数を指定する。 初期値は 10 で Int 型。
値 2 にしたもの

コード
// シーン設定
let scnView = self.view as! SCNView
scnView.showsStatistics = true
scnView.allowsCameraControl = true
scnView.debugOptions = .showWireframe // ワイヤーフレーム表示

let scene = SCNScene()
scene.background.contents = UIColor.white
scnView.scene = scene

// カメラ設定
let cameraNode = SCNNode()
cameraNode.camera = SCNCamera()
cameraNode.position = SCNVector3(2.372,1.473,2.399)
cameraNode.eulerAngles = SCNVector3(-Float.pi * 0.125,Float.pi * 0.25,0)
scene.rootNode.addChildNode(cameraNode)

// ライト設定
let lightNode = SCNNode()
let omniLight = SCNLight()
omniLight.type = .omni
lightNode.light = omniLight
lightNode.position = SCNVector3(0,5,0)
scene.rootNode.addChildNode(lightNode)

// SCNBox
let box = SCNBox(width: 1, height: 1, length: 1, chamferRadius: 0.1)
/*
box.width = 1
box.height = 1
box.length = 1
box.chamferRadius = 0.1
*/

box.widthSegmentCount = 4
box.heightSegmentCount = 4
box.lengthSegmentCount = 4
box.chamferSegmentCount = 10

let node = SCNNode(geometry: box)
scene.rootNode.addChildNode(node)}
今回はここまで。