Swift で Touch Bar 開発 - ラベルを張り付ける
そのままでは動かなくなったので、
新しい方の記事を参照
以下、過去記事
とりあえず、タッチバーにラベルを貼るだけのアプリを作成してみたいと思う。

シミュレータを使用するのでここ最近の Mac なら使用できるはず。
下準備
2016/11/02 現在では以下のバージョンの macOS と Xcode が必要。
まずは App ストアから最新の macOS と Xcode をインストール。
罠としてはストアの macOS ではタッチバーのシミュレータは動作しない可能性がある。
Xcode 起動後、メニューバーの Widnow に Show Touch Bar が出なければ、
https://support.apple.com/kb/dl1897 から macOS 10.12.1 build 12B2657 をダウンロード。
terminal で sw_vers を入力して表示されるビルドナンバーが 16B2555 となっていても、
上記のものをインストールしないと Show Touch Bar が表示されない場合があるので注意。

これで下準備完了。 Show Touch Bar を押すとシミュレータが起動する。
コードの振る舞い
どうやら、NSWindowController が起点となっており、
NSWindowController の makeTouchBar() メソッドをオーバーライドして NSTouchBar を設定し、
デリゲートで中身を設定する模様。
また、ViewController の方でも設定可能っぽい。
タッチバーや、タッチバーに表示するアイテムには識別用の名前が必要らしく、Apple のサンプルだとアプリ名 + アイテム名という形になっている。
開発
Xcode から新規プロジェクトで macOS タブの Cocoa アプリを選択。
適当な名前を付けプロジェクトを作成。
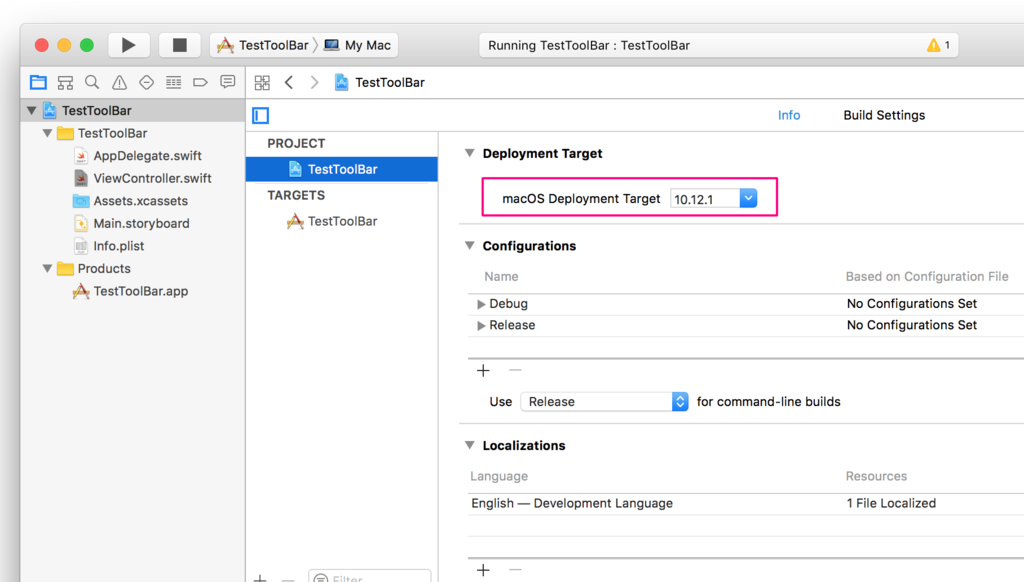
まず初めにプロジェクト設定の macOS Deployment Target を 10.12.1 で手で入力。
候補が出ないので。
現状、このバージョンを入力しないとビルドできない。

コードを書く
NSWindowController
今回は面倒なので、最初からある ViewController.swift に書く。
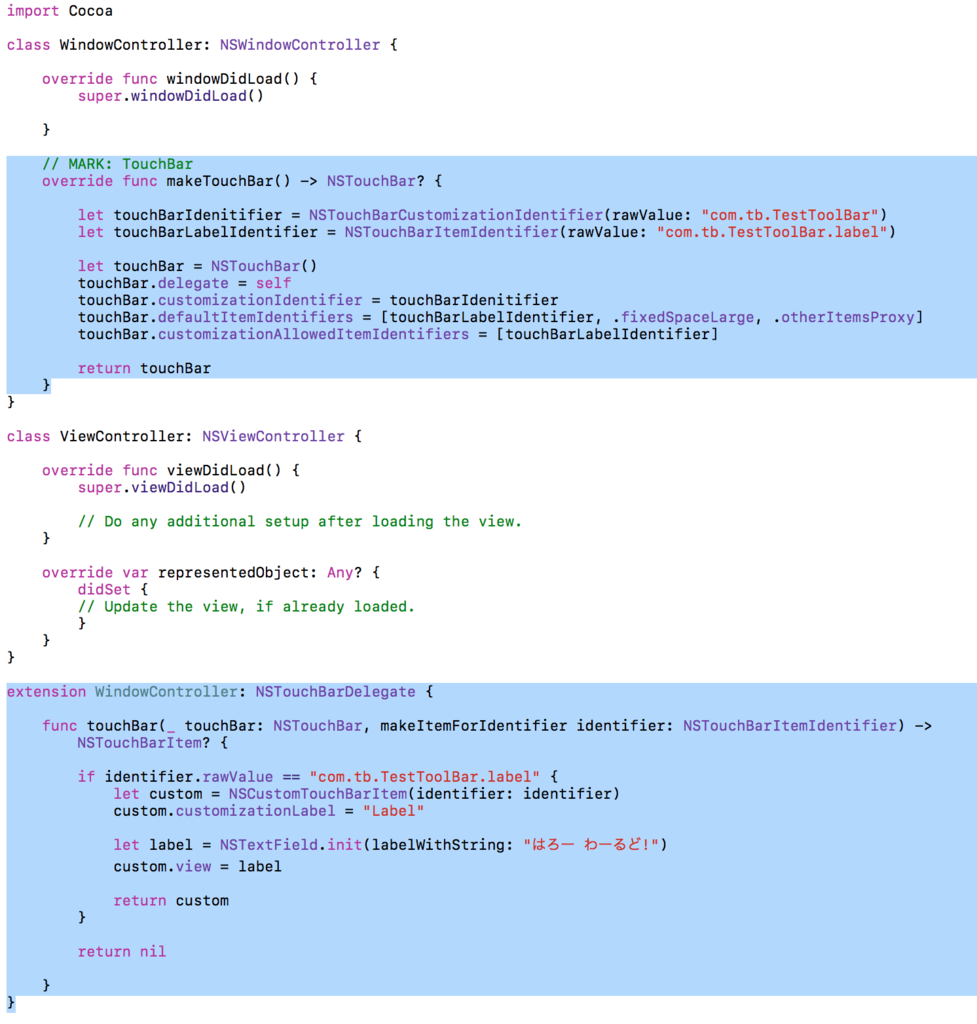
class ViewController の上に以下を書いてみた。
class WindowController: NSWindowController {

    override func windowDidLoad() {
        super.windowDidLoad()

    }

    override func makeTouchBar() -> NSTouchBar? {

        let touchBarIdenitifier = NSTouchBarCustomizationIdentifier(rawValue: "com.tb.TestToolBar")
        let touchBarLabelIdentifier = NSTouchBarItemIdentifier(rawValue: "com.tb.TestToolBar.label")

        let touchBar = NSTouchBar()
        touchBar.delegate = self
        touchBar.customizationIdentifier = touchBarIdenitifier
        touchBar.defaultItemIdentifiers = [touchBarLabelIdentifier, .fixedSpaceLarge, .otherItemsProxy]
        touchBar.customizationAllowedItemIdentifiers = [touchBarLabelIdentifier]

        return touchBar
    }
}
基本は NSTouchBar に識別名を設定し、そのデリゲートを設定して返すだけ。
今回は面倒なので、識別名は makeTouchBar() に touchBarIdenitifier、touchBarLabelIdentifier を書いている。
Apple のサンプルだと、fileprivate extension NSTouchBarCustomizationIdentifier 等の中で使っていて、本来はこちらの方がよいと思われる。
NSTouchBar のデリゲート設定
デリゲートを設定しているので、以下のものをどこかに書く。
extension WindowController: NSTouchBarDelegate {

    func touchBar(_ touchBar: NSTouchBar, makeItemForIdentifier identifier: NSTouchBarItemIdentifier) -> NSTouchBarItem? {

        if identifier.rawValue == "com.tb.TestToolBar.label" {
            let custom = NSCustomTouchBarItem(identifier: identifier)
            custom.customizationLabel = "Label"

            let label = NSTextField.init(labelWithString: "はろー わーるど!")
            custom.view = label

            return custom
        }

        return nil
    }
}
見ての通り touchBar() メソッドで識別名を調べて設定し、ラベルを Touch Bar の view に設定している。
view なので、ボタンやスライダー、カラーピッカー、画像、セグメントボタンなどいろいろ設定可能。
もちろんのことだが、Touch Bar のボタン等に target でメイン画面での振る舞いと紐づければ、Touch Bar からアプリの操作もできる。
また、タッチイベントが取れるので、Apple のデモのように Final Cut Pro のタイムラインや、DJ ソフトの波形の指で左右に移動でする UI を使用できる。
一応、ViewController 全コードのスクショ。

Storyboard の設定
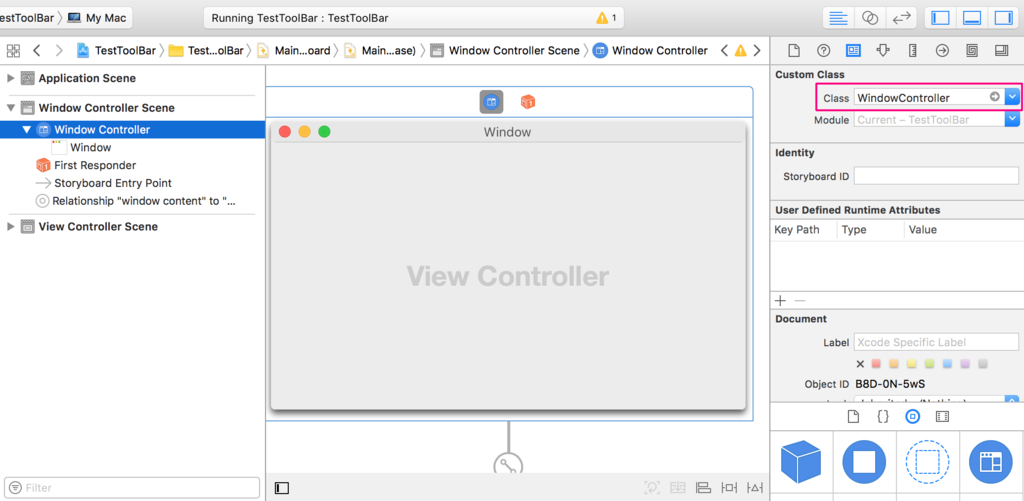
あとは Storyboard の MSWindowController の Class を先ほどつくった WindowController クラスを設定する。

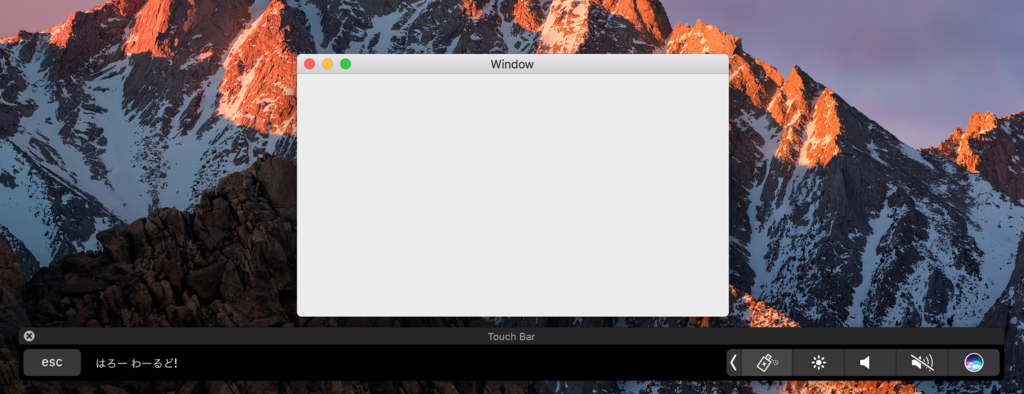
ビルドすると Touch Bar にラベルが表示されるはず。
これで触りを知ることができたと思われる。
いろいろ説明を省略しているので公式サイトの情報を見てほしい。